An Ultimate Make-Up Tutorial for MTF Transition
This is a comprehensive make-up tutorial for femboys, crossdressers, and MtF transwomen.
Kirin
Founder
Intro
Starting out with make-up can be a daunting thing to get into for people who want to achieve a more feminine look. In this guide, I will try to explain all the essentials and the baseline for all the things you need. That said this guide is primarily for Crossdressers, femboys, and MtF trans people. Again that being said anyone who wants a more feminine look could see a good couple of tips here.
Is there a correct order to apply makeup and does it really matter?
Actually, yes, it does make a difference. Professionals in the beauty business and the really good transformation artists tell us that there is a preferred order in which you want to apply products to ensure you gain the most benefit and best appearance.
Things you need
The list of things you will have to buy. I’ll try to go into each one more specifically but you should always get the highest quality stuff you can get your hands on. Though if you are short on money I myself had great success with even Chinese knock-off brands, they just last shorter and they might be less healthy for your skin.
Must Haves
-
Brushes: Brushes are the most important part of the make-up, you will need many of them, make sure to get at least 5 different sizes and one at least very small and one very big. When buying brushes you should always get the best quality ones you can, as cheap ones can make applying make-up a nightmare and also they don’t last as long.
-
Sponges: Make-up sponges, also known as Blending sponges or Blender sponges, are a must. You really can not apply your foundation properly without one.
-
Foundation: Don’t buy these online especially if it is your first time getting a foundation. If you have a beard shadow you will need two of these, one slightly lighter than your skin, and one slightly darker than your skin. If you have no beard shadow you can just the exact match your skin. But please do not buy them online, you will get them wrong.
-
Concealer: You have to have this if you have a beard shadow. Get one that is lighter than your skin. Also, make sure it is a full coverage concealer. If you have the money to spare make sure that it is waterproof as well.
-
Color Correctors: This is essential for beard covering. I usually use two of these. One for red spots and one for beard and dark spots. Green-colored correctors are for covering red spots and Nude(skin color) colored ones are for covering dark spots. You don’t need the green one if you have no acnes or any red spots but I find it very useful regardless, as you can hide things on your neck or chest etc.
-
Lipstick: Well, this one is pretty obvious though I’d highly recommend getting a quality one and don’t go for gloss ones. I recommend getting a nude tone or red for beginners depending on the look you want.
-
Eyeliner: This is a highly debated one, as to which type of eyeliners are best for beginners. In my experience, it really changes per person. Pen ones are pretty cheap you can get those easily. Though I found more success with liquid ones. Your mileage may vary though. You just have to try it.
-
Mascara: You need this. Make sure it is black. Eyelashes although a small part of your face, do make a huge difference when it comes to looking more feminine. If you are not going to use false lashes it’s extremely important you have a mascara, also if you are going to use false lashes you still want to use mascara with it.
-
Eye Shadow: This is very important but at first, you don’t need a plethora of colors you can just get the ones with 3 or 4 colors in them. Usually, people recommend lighter colors for beginners but it is up to you. You just have to be a bit more careful with darker ones.
-
Powder: You need what’s called a loose translucent antiperspirant powder also known as setting powder. This is important if you want your make-up to last more than two hours.
Highly Recommended
-
Primer: Although you can do without this, primer makes your make-up a lot better. You will need two of these, one face primer and one eye primer. Go for the ones that say “smooth”.
-
Lip Liner: Get the one close to your lipstick color. This can help achieve a more full look for your lips.
-
Eyebrow Pencil: I recommend getting a darker tone than your natural eyebrow color but if you have black brows like me, just get the black one. Even if you have thick eyebrows like me, it does make a big difference, trust me.
-
Bronzer: This is my favorite. This is very important if you want a feminine look. Get the ones that are not shiny or have glitter in them.
-
Highlighter: Goes hand to hand with bronzer, don’t go for the ones that have glitter in them.
-
Eyelash Curler: This makes a huge difference trust me. Again like mascara, this will make your lashes look more full and a bit curly.
Recommended
-
False Lashes: False Lashes also known as Fake Lashes can be hard to put on for beginners but the only way to learn is to practice it and it makes a HUGE difference to your face.
-
Lip Gloss: If you want your lips to look even better consider this. Though the shiny look isn’t for everyone.
-
Lip Plumper: This is basically for making your lips a bit bigger. You can get one of these for cheap although in a later section I will show you how to achieve the same effect without spending any money.
-
Blush: I never use blush myself but if it’s a look you want, you can go for it.
Other Things
-
Lip Balm: I’d highly recommend you invest in a good quality lip balm. Balms really do make your lips look 10 times better if used regularly. They also prevent dryness.
-
Moisturizer: This is essential skincare, consider getting a good quality one if you want your skin to look good at all times and maybe even prevent aging a little bit.
-
Tweezers: This is really important for stray hairs on your face. You might also need it for applying false eyelashes. And most importantly trim eyebrows.
-
Make-up Removers: I never use commercial make-up remover wipes myself. Wet wipes and warm water soap does the trick for me but if you can you can get these as they make removing the make-up easier.
-
Q-Tips: Always have at least a couple of q-tips when you are doing your make-up, they are very good for correcting small mistakes you will make.
Before Starting to Apply Make-Up
It is very important before any make-up application is to prepare the skin – if necessary this will obviously include hair removal/shaving and then moisturizing. Applying an oil-free moisturizer not only gives the skin a smoother finish after cleansing, but it actually stops the skin from creating excess oil. So, in addition to conditioning and hydrating the skin a good moisturizer will help maintain the eventual makeup application. You should also apply your lip balm before starting your make-up. When doing your make-up make sure you have a good light source in the room, if possible, it should be behind the mirror.
Applying the Make-Up
Primer (Optional)
Before doing any make-up it is important to apply your primer make sure to cover all your face with the two different primers you have. What primer essentially does is that it closes the small bumps on your face which gives your face a smoother look and also provides a canvas for the make-up. You can use a brush or your fingers to apply this.
Foundation
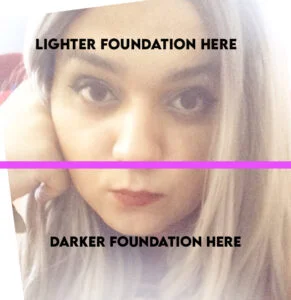
This is the most important step, so take your time while doing this. First, get the darker foundation you have and squeeze a bit onto your sponge then start applying it to the lower half of your face. Then, put some of the lighter foundation on the sponge and start applying it to the upper half of your face. Make sure they cover all of your face and blend well. You should ALWAYS apply some to your neck otherwise you might have a different color face and neck which looks really bad.
Concealer
This is pretty simple, put some concealer on the tip of your sponge and apply it to the dark areas and areas that might need concealing. Make sure to use a lot for the bread area and don’t forget to blend it.
Color Correction
Green corrector for the red spots. Nude corrector for the dark spots. Use a lot for the bread areas and blend it. You can use the sponge for the blending.
Eye Shadow
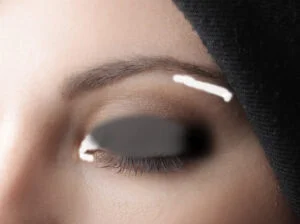
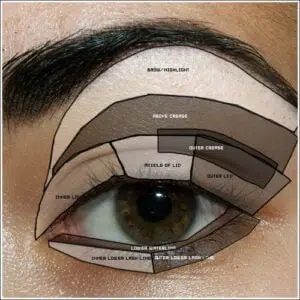
First of let’s try starting with 3 colors. You need to apply the lightest color you have to the very inner crest of your eye. Then in the middle whatever mid-color you have put it. Blend it, with a separate brush. Then on the very outer of the crest, you apply the darkest color you have. Most of your eyelids should be covered in the mid-color, do not overuse dark colors as that can look very bad. You should also apply the lightest color under your eyebrow a tiny bit. The image below shows you the areas you need to apply them to. White is the lightest, gray is mid-color, and black is the darkest. Don’t forget to blend them, that is the most important part.
Eye Liner
There are many great videos about how to apply eyeliner correctly, you might wanna look at those. If you have a liquid one, you can do this step after putting on false lashes. The tricky part about applying eyeliner is to get them equal to each other and this is only achievable by practice really. I recommend starting with the tail, then working towards the inner upper crest, and lastly doing the lower lashline, if you have a dip liner, you might also want to apply it to the waterline.
Eyelash Curler (Optional)
This simple tool is really easy to use, just get your lashes between them make sure you are looking straight, and press it! You might wanna press more than once.
False Eyelashes (Optional)
Again, this is a tricky one and there are many videos about how to apply them correctly. Honestly, there aren’t many things I can say about this one as this really does require practice. Some people use tweezers for this, I prefer my hands but it is up to you. Transparent lash glues are better but if you have a black one those work just fine too, but, you have to be a bit more careful.
Mascara
There is no trick to applying mascara, just make sure you apply some and don’t forget about the lower lashes make sure to apply to them as well. If your lower lashes are small like mine, you can just hold the mascara horizontally and apply it with the tip of it.
Eyebrow Pen (Optional)
If you have an extra brush take it and apply concealer all over your eyebrows, then take the pen and draw inside your brows lightly. Don’t fill all of your brows, leave like 1/5 gap. This will make it look like you have smaller eyebrows, and give you a more feminine look. If you don’t have an extra brush or concealer, just apply the pen inside of your brush very lightly.
Lip Plumper (Optional)
Put your lips in it and suck it for about 3-5 mins. If you don’t have lip plumper, get a small water glass or a tea glass and put your lips inside and suck air inside, this essentially makes it so blood flows to your lips, giving a bit more full look. Do not go over 5 mins!
Lip Liner (Optional)
Take the pen and draw outside your lips. Make sure to mirror the shape of your lips.
Lipstick
It is pretty simple, just fill in the lips until the lip liner then close the lips. Don’t make a sideways movement with your lips. You can also try only filling the bottom lip and closing them together, which will make it so it goes everywhere you want. Although that method does not work for every kind of lipstick.
Lip Gloss (Optional)
Simply put a tiny bit on your bottom lip then close your lips together.
Highlighter
As the name implies you have to apply this to the areas you want to be highlighted. First, the cheekbones, then the nose bridge, and lastly on your chin. Make sure to blend it.

Bronzer
In my opinion, this is one of the most important steps. You want to apply this to your lower cheeks and between brows and hair. Make sure to not go overboard with this as that can be an uncanny look. Also, make sure to blend it.
Setting Powder
Now it is time to use the powder this will make sure your make-up lasts a lot longer, so you can apply it to anywhere you see fit but I highly recommend applying it to the areas you used the color corrector.
Conclusion
This guide is just that a guide, you do not have to follow anything said here strictly. Make-up should be fun, don’t be afraid to try new things and have fun with it. The most important thing about getting better at make-up is to practice, there is really no other way, do not be afraid to make mistakes, you will get better!
Now go and get feminine!
Written by
Kirin
Founder
Kirin helps shape Unicornia as founder.
Share
Explore this topic
Keep reading